Welcome
Learn how to install, configure, and create dynamic prefixes for your invoices.
Learn how to install, configure, and create dynamic prefixes for your invoices.
Create dynamic prefixes and unique, standardized invoice numbers for every store.
The ultimate solution for merchants looking to standardize and organize their invoice numbering. With an innovative approach based on dynamic prefixes, this module allows you to create custom rules for each store.
Ensure you have permissions in:
The invoice number is automatically created upon order completion.
Create unique dynamic prefixes for each store, ensuring organization and traceability even in complex environments.
Intuitive interface with native translations in PT, EN, FR, ES, and IT.
The invoice number formation is modular and flexible, divided into two components.
Macro identifiers that precede the sequential number (e.g., ABC-XYZ-).
The mandatory sequential core (e.g., 0001), ensuring uniqueness.
The structure processes each character literally, linking the numerical sequence to the combination of prefixes and separators. Any change — such as swapping a hyphen (-) for a slash (/) — defines a new identity, automatically restarting the numerical sequence for that specific identifier.
ABC-XYZ-0001 |
Reference standard. |
ABC/XYZ-0001 |
The slash changes the prefix: count restarts for this new group. |
To maintain readability on labels and reports, use short acronyms for representation.
INV-ST1-001
(Invoice - Store 1)
INVOICE-STORE01-001
Follow the steps below to securely integrate the module into your OpenCart system.
In the store admin, go to Extensions > Installer. Click Upload and select the downloaded file.
Locate the module in the list of installed extensions and click the Install icon to activate it.
After installation, follow this flow to configure your automation.
Go to Extensions > Extensions.
Select the type Modules.
Click Edit to open the panel.
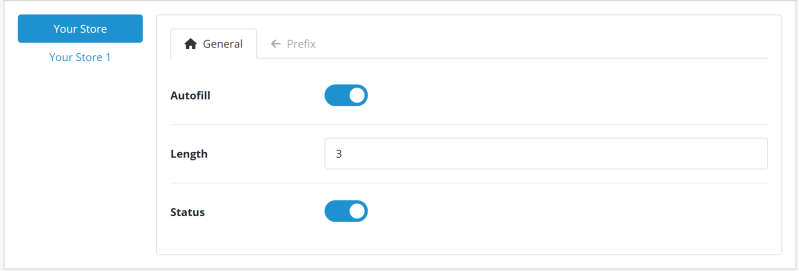
| Parameter | Function |
|---|---|
| Autofill | Creates the invoice number when the order is confirmed. |
| Length | Defines the number of digits for the sequential number (Zero padding to the left). |
| Status | Enables the module. |
This tab allows you to compose text or date elements.
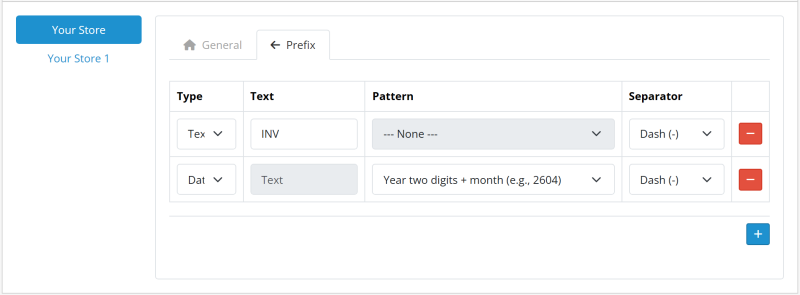
| Parameter | Description |
|---|---|
| Type | Defines if the element will be Fixed Text or a Dynamic Date. |
| Content (Text) | The textual value to be displayed (e.g., INV). |
| Format (Date) | The desired date pattern (e.g., Two-digit year + month). |
| Internal Separator | Character that will join this element to the next one. |
Tip: You can add multiple elements to create complex prefixes, such as INV-2026-ST01-.
There are two ways to generate invoice numbers:
With Autofill (under the General Settings tab) enabled, the invoice number is generated at the moment of order confirmation, eliminating the need for any manual action.
If the option is disabled, the invoice number follows the standard OpenCart flow. Generation must be done manually by following these steps:
In the sidebar menu, go to Sales > Orders.
Locate the desired order and click the View button.
Click Generate next to the Invoice field.
Follow the steps below for a clean and safe uninstallation.
Go to Extensions > Extensions, filter by Modules, locate the module and click Uninstall.
Locate the module in the Extensions > Installer list or extension list and click the Uninstall icon.
Still in the installed extensions list, locate the file and click Delete.
Uninstallation removes the module's settings and files. However, the generated numbers will remain saved in the database to prevent loss of integrity in your records.
I know, it's a paid module, but if it's saving your day and optimizing your system, how about a coffee? This helps keep the code clean, the support fast, and the caffeine flowing for future updates!
Free and Full versions licensing terms.
This extension (Free and Full versions) is licensed under the GNU General Public License v3.0 (GPL-3.0).
Use and modification of the software must comply with the terms established by the GPL-3.0 license.
Technical support and updates are provided exclusively to original purchasers through the official OpenCart Marketplace.
For complete license details, please refer to the LICENSE file included in this repository or visit the official page of the GNU General Public License v3.0 .